Decoupled Drupal And React Connection: Know Everything Here

In the realm of sandwiches, there are now two kinds of people: those who want to purchase sandwiches off the menu and those who prefer to build their own by selecting the bread, filling, and sauce. The latter group, whom we like to refer to as “Sandwich Mavericks,” would probably desire their websites to be just as distinctive as their handmade sandwiches. They are not constrained by the CMS’s templates and themes or by a particular front-end technology. You may be the architect of your own online fate with a decoupled Drupal CMS architecture.
If you haven’t developed a sandwich desire yet, read this post to find out more about decoupled Drupal and how to create very tasty online experiences for your audience by utilizing React as the front-end technology.
- What is Decoupled Drupal?
- Traditional CMS VS Decoupled CMS
- Should you consider decoupling Drupal?
- How does Drupal support headless
- Creating a decoupled Drupal with React
- Setting Up the Drupal application
- Setting Up the Frontend Application (React)
What is Decoupled Drupal?
Decoupled refers to the state of being cut off or divided. It describes a frontend that is separate from the Drupal architecture in terms of Drupal. Therefore, in a decoupled Drupal design, any frontend technology, such as React, AngularJS, VueJS, etc., can manage the contents while Drupal handles the backend.
Headless Drupal is another name for decoupled Drupal.
Traditional CMS VS Decoupled CMS
Among the principal distinctions between decoupled and conventional Drupal are:
- While decoupled Drupal can use any of the aforementioned cutting-edge frontend technologies, traditional Drupal employs Twig as its frontend tool.
- Many default features, such as a layout builder and content preview, are offered by traditional Drupal. In decoupled Drupal, developing these features will require more work.
- Drupal that is decoupled has average to fast page speeds, while traditional Drupal has average to slow page speeds.
- While decoupled Drupal can employ both monolithic and microservices design, traditional Drupal uses monolithic architecture.
- In standard Drupal, the level of technical complexity is moderate, but in decoupled Drupal, it is really high.

Should you consider decoupling Drupal?
Selecting between the two is not an easy choice. It depends on a number of aspects, chief among them being that many features that come packed with Drupal are more complex and require more work to recreate in decoupled Drupal. This may result in more technical complexity and higher development expenses.
But it also makes it easy to integrate Drupal with other contemporary technologies, including mobile apps, configuration-based user interfaces, IoT, and single-page applications (SPAs). It also provides reusable content features.
How does Drupal support headless
Drupal uses an API-first architecture, so we can store and serve content via APIs by leveraging its backend structure. Because Drupal’s core natively supports JSON:API/REST API, we may use REST to interact with front-end technologies and deliver content as JSON.
You can read this article to determine which option—JSON API, REST API, or Graph QL—to select.
Creating a decoupled Drupal with React
Now let’s get to work creating a decoupled Drupal project using React.
Your Project folder structure will resemble this:
Our Drupal project and React app are located under the root directory.
Note: docker-compose is used here.The docker container made for Drupal and the React app is managed using yml.
Our Drupal project is made with the help of:
composer create-project drupal/recommended-project my_site_name
And our React app is created with:
npx create-react-app my-app
Setting Up the Drupal application
Step 1: To get started, we need to configure a few things on the Drupal side:
a) In services.yml, enable CORs settings.
# Configure Cross-Site HTTP requests (CORS).
# Read https://developer.mozilla.org/en-US/docs/Web/HTTP/Access_control_CORS
# for more information about the topic in general.
# Note: By default the configuration is disabled.
cors.config:
enabled: true
# Specify allowed headers, like ‘x-allowed-header’.
allowedHeaders: [‘*’]
# Specify allowed request methods, specify [‘*’] to allow all possible ones.
allowedMethods: [‘*’]
# Configure requests allowed from specific origins. Do not include trailing
# slashes with URLs.
allowedOrigins: [‘*’]
# Sets the Access-Control-Expose-Headers header.
exposedHeaders: false
# Sets the Access-Control-Max-Age header.
maxAge: false
# Sets the Access-Control-Allow-Credentials header.
supportsCredentials: true
b) Turn on the serialization, rest, and rest UI modules.

Drupal 9 comes with serialization and Restful Web Services modules installed by default. Rest UI is a contrib module that you must install.
composer require 'drupal/restui:^1.21'
c) On the Rest UI module, click the configure settings button. The “Content” Resource name should then be enabled.

It transforms the data received from Drupal into JSON when this is enabled.
Step 2: Open any content page to gain access to it. In this case, we’re opening an article page.

The data will now be displayed in JSON format if you provide the?_format=json query option (a characteristic of RESTful Web services).
Step 3: Let’s now construct a view on Drupal that contains the most recent articles (see screenshot)
Some guidelines for developing the view.

a) Make a view called “rest export.” Data from our most recent articles will be sent to our React app via this.
b) Authentication is provided as a “cookie” under path settings. B asic authentication is another option. You must install the basic auth module in order to do that. Since cookie-based authentication is more user-friendly when interacting with mobile applications, we are exclusively using it for this demo.
Step 4: Go to the view link (this is /articles/latest) when it has been established. The data will be displayed to you in JSON format.
Note: For this view page, the _format=json argument is not required.

Setting Up the Frontend Application (React)
After completing the setup of our Drupal website, let’s start developing our React application.
1) Structure of folders
We have the boilerplate code to get started with React as we are using create-react-app.
As an aside, for better performance, Vite is preferable to Create-react-app.
2) Make the scaffolding for the front end.
<div className=”App”>
<header className=”App-header”>
<h1 className=’header mb-4′>React APP</h1>
<div className=”btn-wrapper”>
<div><button className=”btn” onClick={() => {setIsModalOpen(true)}}>Add Nodes</button></div>
</div>
</header>
<Results articleUpdated={articleUpdated} setArticleUpdated={setArticleUpdated}/>
</div>
<div className={clsx(“modal”, isModalOpen && ‘show’)} id=”#addForm”>
<button className=’close-btn’ onClick={() => {setIsModalOpen(false)}}>X</button>
<div className=”modal-header”></div>
<div className=”modal-body”>
<form className=”modal-form” onSubmit={handleAddSubmit}>
<div className=”field_item”>
<label htmlFor=”title”>Title</label>
<input typeof=’text’ name=’title’ id=”title” onChange={(e) => setFormData({…formData, title: e.target.value})} value={formData.title}/>
</div>
<div className=”field_item”>
<label htmlFor=”title”>Short Description</label>
<input typeof=’text’ name=’short_desc’ id=”short_desc” onChange={(e) => setFormData({…formData, shortDesc: e.target.value})} value={formData.shortDesc}/>
</div>
<div className=”field_item”>
<label htmlFor=’body-field’>Body</label>
<textarea rows=”5″ cols=”33″ name=’body’ id=”body-field” onChange={(e) => setFormData({…formData, body: e.target.value})} value={formData.body}></textarea>
</div>
<input type=”submit” className=”btn”/>
</form>
</div>
</div>
Don’t worry if the framework seems too much.
There are mostly two parts:
- Results: Displays the outcome of the API query.
- Article: The listing’s article items.
Results.js
const Results = ({articleUpdated, setArticleUpdated}) => {
// article listing state.
const [articleList, setArticleList] = useState([]);
useEffect(()=>{
const relative_path = “/articles/latest”;
// adding intensional delay for UI.
setTimeout(() => {
getData(relative_path)
.then(res => setArticleList(res))
.catch((error) => {console.log(error)})
}, 1000);
},[JSON.stringify(articleList), articleUpdated]);
return (
<div className=”results-wrapper”>
{
articleList?.length === 0 ? <Loader/> :
<div className=”article-lists”>
{
articleList?.map((curr,index) => {
return (
<Article key={curr.uuid} title={curr.title} shortdesc={curr.short_desc} nid={curr.nid} ds={index*10+”ms”} articleUpdated={articleUpdated} setArticleUpdated={setArticleUpdated}/>
)
})
}
</div>
}
</div>
)
}
export default Results;
Article.js
// article item component.
const Article = ({title,shortdesc,nid, ds, articleUpdated, setArticleUpdated}) => {
const handleDelete = (nid) => {
deleteData(nid)
.then((response) => {
if (response.ok) {
setArticleUpdated(articleUpdated + 1)
}
})
.catch((error) => console.error(error))
}
return (
<div className=”article-item” style={{“–ds-delay”: ds }}>
<div className=”article-item–body”>
<h3>{title}</h3>
<p>{shortdesc}</p>
<button className=”delete-btn” onClick={() => {handleDelete(nid)}}>Delete</button>
</div>
</div>
)
}
GetData() and postData() are used by the Results component to retrieve and upload data from Drupal.
getData()
export async function getData(relative_path, query_params) {
const hasQuery = query_params ? “?” + query_params : “”;
const generated_URL = endpointUrl + relative_path + hasQuery;
try {
const res = await fetch(generated_URL);
const get_response = await res.json();
return get_response;
} catch(error) {
console.error(error)
}
}
postData()
export async function postData(data_to_post) {
try {
const response = await fetch(tokenURL)
const csrf_token = await response.text()
const post_data = {
“type”: [{
“target_id”: ‘article’,
}],
“title”: [{
“value”: data_to_post.title,
}],
“body”: [{
“value”: data_to_post.body,
}],
};
const generated_URL = endpointUrl + “/node?_format=json”;
const post_response = await fetch(generated_URL, {
method: “POST”,
headers: {
“Content-Type”: “application/json”,
“X-CSRF-Token”: csrf_token,
},
body: JSON.stringify(post_data),
credentials: “include”
})
return post_response;
} catch(error) {
console.log(error);
}
}
utilized state variables
const [formData, setFormData] = useState({
title: “”,
shortDesc: “”,
body: “”,
img_field: “”,
});
const [articleUpdated,setArticleUpdated] = useState(0);
Form handler
const handleAddSubmit = (event) => {
event.preventDefault();
postData(formData).then((res) => {
if(res?.ok){
setArticleUpdated(articleUpdated+1)
}else {
console.log(‘invalid form submission’)
}
})
setIsModalOpen(false);
}
3) Run npm start after adding all the CSS and React code to the preferred design (Note: CSS code is not included).
This will launch your application for React.
You may now add data to the React app, and Drupal will save it. Additionally, we can examine the updated result on our React app by using the get method.
The outcome is as follows:
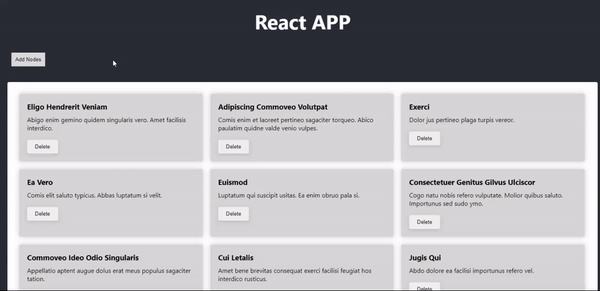
Now, the test data is saved on the Drupal application.

Final Thoughts
The Headless/Decoupled Drupal is a step toward that in the current industry trend toward API-first architecture, the emergence of contemporary frontend tools to better serve the client, and the ability to leverage Drupal capabilities along with other potent architectures. It is currently difficult to develop a fully decoupled website due to the inadequate documentation for decoupled design using best practices and the difficulties of extracting data from some frequently used Drupal features, such as the paragraph module and layout builder. As Drupal founder Dries Buytaert also advises, choosing to go gradually detached right now is a preferable option.
Decoupled architecture presents a number of benefits and drawbacks; the choice should be made based on the desired outcome. Find out how Appic Softwares can help you navigate these seas and provide a customized solution that satisfies your particular requirements by connecting with us now!