In the realm of page development, content authors and editors seek intuitive and user-friendly experiences. They desire tools like drag-and-drop functionality and visual design capabilities that enable them to create and customize pages effortlessly. Drupal’s Layout Builder fulfills these needs by integrating a robust page-building feature directly into Drupal’s core functionality.
The Drupal 9 Layout Builder has two distinct modes of operation that users can choose from. It is possible to design a layout for each unique content category on the website as well as a layout for a specific piece of material that can be displayed on the website.
Introduction to Drupal’s Layout Builder
The Drupal 9 Layout Builder module gives you the ability to modify the appearance of entities like content types, taxonomy, and users, amongst other things. It gives site builders an option to place blocks, fields, and other elements by dragging and dropping them into position.
By providing a preview of the changes made while you are in the process of developing your layouts, the layout builder module that is included in Drupal 9 makes it much simpler for you to construct your layouts. In Drupal 9, the layout builder offers previews of the changes that have been made for a more seamless experience when designing a layout. Previously, this required the user to save every little modification made in the layout before checking it up on the front end.
Installing and Configuring the Drupal 9 Layout Builder Module
To install and configure the Drupal 9 layout builder module, go to Extend and enable both the Layout Builder and Layout Discovery modules. This will complete the installation process.

Source: Specbee
Important: The Layout Builder module became available as a stable option in Drupal 8.7’s core. Therefore, check that you are utilizing the most recent version. In earlier versions of Drupal, this module was considered to be experimental.
Adapting Content Types and Taxonomies Using the Drupal Layout Builder
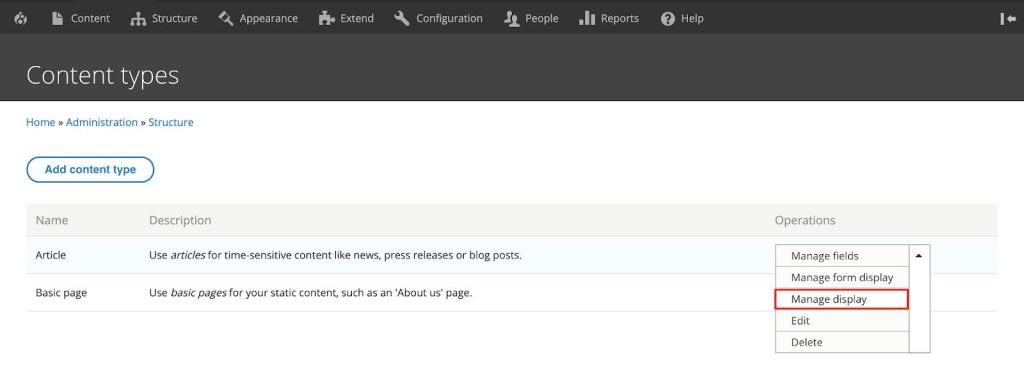
Once the module has been successfully installed, go to Structure, then Content Types, and click the “Manage display” button for any content type. For the time being, we will utilize the “article” content type.
Scroll down to the bottom of the page, click on Layout choices, then click on Save after selecting the “Use Layout Builder” option.

When you have Layout Builder selected for the view mode, you will see a “Manage Layout” option where the field formatters were previously displayed. Any of the available view modes can be accessed through the Layout Builder.

Source: Specbee
When you select “Manage Layout” from the drop-down menu, you will be taken to the article content type layout.

Adding Sections to the Layout
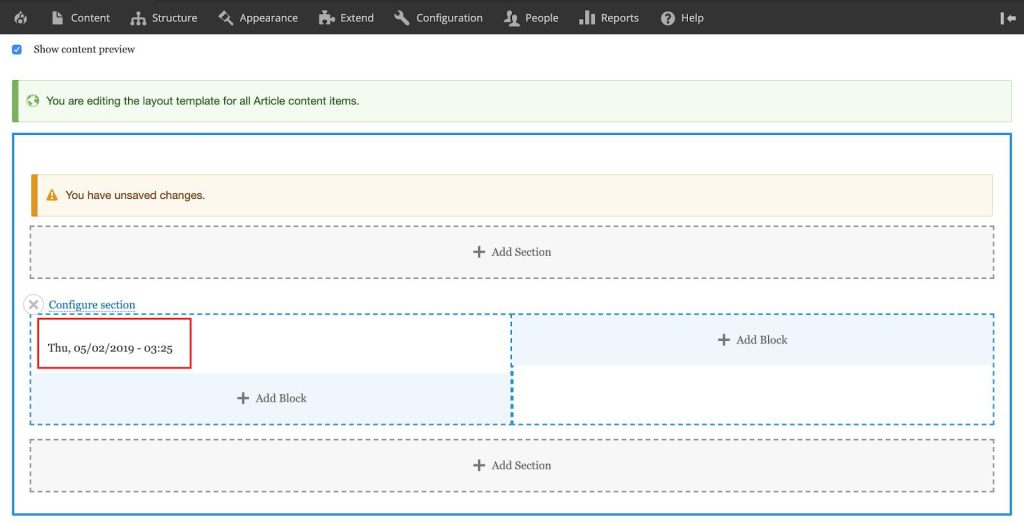
Before adding more parts to the layout builder, you must first delete the default section. Simply select the X that appears next to the icon depicting a closed window (as shown in the screenshot below). Additionally, an option to delete the default section will be presented on the right side of your screen when you click the “Edit” button. Select “Remove” from the menu.

Let’s add some more parts to our layout by selecting the “Add Section” option from the drop-down menu. In addition, alternatives will be presented to you on the right-hand side of the screen, allowing you to choose a layout that best suits your needs for your sector. Let’s go ahead and choose the “Two Column Section” for the time being.

Source: Specbee
Your “Two Column Layout” will provide you with the ability to determine the width of the layout. For the time being, let us go with the “50%/50%” option. After that, select the “Add section” option.

After the block has been added, you should be able to view a link labeled “Add Block” for each part region.

Placing Blocks in Section Regions
After deciding which area of the layout to use, you will be able to insert blocks into that section. Simply clicking on the “Add Block” button will cause the option to “Choose a block” to slide out from the right side of the screen.

Choosing a Block
Simply clicking on the blocks that are located to the right will allow you to select them. You may even locate blocks by filtering them out using the “Filter by block name” text field, which allows you to do so by the names of the blocks. For the time being, we shall choose the “Authored on” content field.

You will be able to make changes to the field formatter after you have clicked on the block that you wish to add. After you have finished
configuring the formatter, select “Add Block” from the menu.

The “Authored On” content field will be moved to the left side of the block after it is done being added.
You must save your modifications after you have added the “Authored On” field. Click the “Save Layout” option that is located at the very top of the Drupal 9 layout page to save all of the changes that you have made to your section.

Let’s attempt customizing our layout builder by including some additional fields in our layout by adding some more fields.

Source: Specbee
After you have saved this layout, you may view a preview of the layout that you have just generated by going to a page for an article content type after you have finished saving the layout.

Source: Specbee
Customizing Default Layout Overrides
The structure that we have just finished developing will be utilized for the presentation of all of the content. If you want to create a unique layout for a certain article in Drupal, you will first need to enable some options that have been offered by Drupal for that purpose. To accomplish this, you will need
to enable the option to “Allow each content item to have its layout customized.”

Source: Specbee
If you go to an article after activating this option, you will notice that there is a button labeled Layout tab.
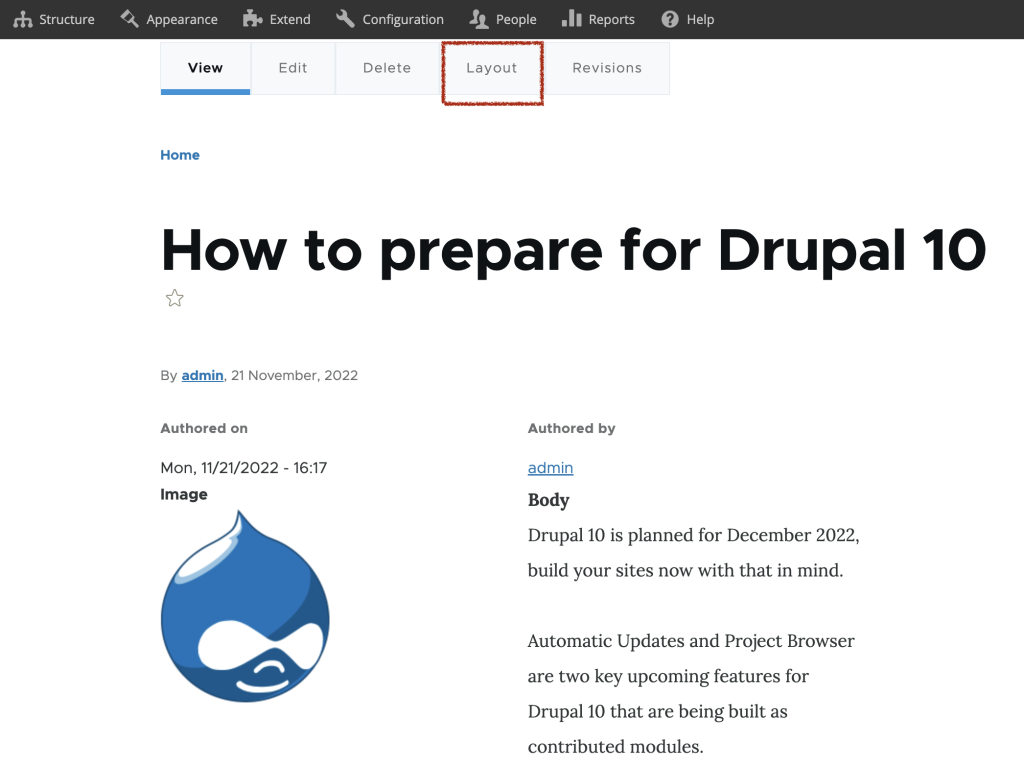
Override Default Layout
You will continue to use the same interface to make changes to the layout. Nevertheless, this will only affect the format of the presentation of this one particular piece of content.

The Drupal 9 Layout Builder has made a significant contribution to the enhancement of the content editing experience for site builders and content editors. However, if you are looking for a Drupal Development Company, then you should check out Appic Softwares. We have an experienced team of Drupal developers who can help you gain the best out of your software.
You can even hire dedicated Drupal developers from us and manage your project requirements. So, what are you waiting for?